Showing posts with label tutorial. Show all posts

23 April 2011

🪄SSRS (& Paginated Reports): First Steps (Part I: Wizarding a Report)

Introduction

One year back I started a set of posts on SSIS showing how to create a package with ‘SQL Server Import and Export Wizard’ using as source a SQL Server, respectively Oracle database, in a third post showing how to use the Data Flow Task. The “wizarding” thematic was based on the fact the respective posts were showing how to make use of the wizards built within SQL Server and Visual Studio in order to create a basic export package. Therefore the posts were targeting mainly beginners, my intention at that time was to use them as a starting point in showing various objects and techniques. I also intended to start a set of similar posts on SSRS, so here I am, in this first post showing how to use the Report Wizard to create a report in BIDS (SQL Server Business Intelligence Development Studio) using a SQL Server database.

This short tutorial uses a query based on AdventureWorks2008 sample database and considers that your Reporting Services instance is installed on the same computer with the database. For simplicity, I focused on the minimal information required in order to built a simple report, following to cover some of themes in detail in other posts. The tutorial can be used together with the information provided in MSDN, see Creating a Report Using Report Wizard and Report Layout How-to Topics sections.

Step 1: Create the Query 
 
Before creating a report of any type or platform, it’s recommended to create and stabilize the query on which the report is based. For simplification let’s use a query based on Sales.vIndividualCustomer view:

-- Customer Addresses 
SELECT SIC.Title  
, SIC.FirstName  
, SIC.LastName  
, SIC.AddressLine1  
, SIC.City  
, SIC.PostalCode  
, SIC.CountryRegionName  
, SIC.PhoneNumber  
, SIC.EmailAddress  
FROM Sales.vIndividualCustomer SIC 

Step 2: Create the Project 
 
Launch the BIDS from Windows Menu, create a new Project (File/New/Project) by using the “Report Server Project Wizard” Template, give the Project an appropriate Name and other related information. 
 
SSRS Tutorial New Project
  This will open the Report Wizard, and unless you have chosen previously not to show this step, it will appear a tab in which are shown the step that will be performed:
- Select a data source from which to retrieve data
- Design a query to execute against the data source
- Choose the type of report you want to create
- Specify the basic layout of the report
- Specify the formatting for the report
- Select the report type, choose tabular

Step 3: Create/select the Data Source 
 
Creating a Data Source pointing to the local server isn’t complicated at all, all you have to do is to give your data source a meaningful name (e.g. Adventure Works) and then define connection’s properties by selecting the “Server name” and database’s name, in this case AdventureWorks2008.

SSRS Tutorial Connection Properties 
Test the connection, just to be sure that everything works. In the end your data source might look like this:
SSRS Tutorial Select Data Source
 You can define your data source as shared by clicking the “Make this a shared data source” checkbox, allowing you thus to reuse the respective data source between several projects.

Step 4: Provide the Query 
 
Because the query for our report was created beforehand, is enough to copy it in “Query string” textbox. We could have used the “Query Builder” to built the query, though a tool like SSMS (SQL Server Management Studio) can be considered a better choice for query design. As pointed above, it’s recommended to built the query and stabilize its logic before starting the work on the actual report. SSRS Tutorial Design the Query
Step 5: Generate the Report
   
Creating a report supposes choosing a Report Type (Tabular vs. Matrix), the level at which the fields will be displayed (page, group or details), and the Table Style. For this tutorial choose a Tabular type and, as no grouping is needed, in “Design the Table” step choose all the Available fields and drag-and-drop them in “Details”, the bottommost list from “Displayed fields” section. 
 
SSRS Tutorial Design the Table
 In Choose the Table Style go with the first option (e.g. Slate), though it’s up to you which one of the styles you prefer.

Step 6: Deploy the Report 
 
You can deploy the report if your report server is already configured, however in order to test the report you don’t have to go that far because you can test the report directly in BIDS. So you can go with the actual settings: 
 
SSRS Tutorial Choose the Deployment Location
In the last step provide a meaningful name for the Report (e.g. Customer Addresses) and here is the report in Design mode: 
 
SSRS Tutorial Design
   
By clicking on “Preview” tab you can see how the actual report will look like:
 
SSRS Tutorial Preview 
Now I would recommend you to check what objects the wizard has created and what properties are used. Just play with the layout, observe the behavior and what the documentation says. There are plenty of tutorials on the web, so don't be afraid to search further.

Happy coding!

Happy coding!

Previous Post <<||>> Next Post

11 March 2010

🎡SSIS: Data Flow Task (Third Magic Class)

Independently of the data sources or destinations used, all the ETL tasks have as cornerstone the simple creation of a Data Flow Task. If in the previous two tutorials I was showing how to export data from an Excel file (see First Magic Class), respectively an Oracle database (see Second Magic Class), using the SQL Server Import and Export Wizard, in this tutorial I will show how you can create an SSIS package from the scratch using the SQL Server 2008 Business Intelligence Development Studio.

Step 1: Create the View
Before starting to create the SSIS package and especially when dealing with multiple tables it’s useful to encapsulate the logic in a view, this step allowing you primarily to capture, test, refine and stabilize the requirements before creating the package, thus attempting to minimize the changes done in the package itself, and secondly it allows reusing the logic in other packages or database objects. Here’s the source code for vProducts view that will be used for this tutorial: 
 
CREATEVIEW [Production].[vProducts] 
-- Products (view) 
AS 
SELECT ITM.ProductID 
,ITM.ProductSubcategoryID 
,ITM.ProductModelID 
,ITM.Name ProductName 
,ITM.ProductNumber 
,PPM.Name ProductModel 
,PPM.CatalogDescription 
,PPS.Name ProductSubcategory 
,PPC.Name ProductCategory 
,ITM.MakeFlag 
,ITM.FinishedGoodsFlag 
,ITM.Color 
,ITM.SafetyStockLevel 
,ITM.ReorderPoint 
,ITM.StandardCost 
,ITM.ListPrice 
,ITM.Size 
,ITM.SizeUnitMeasureCode 
,SUOM.Name SizeUnitMeasure 
,ITM.WeightUnitMeasureCode 
,WUOM.Name WeightUnitMeasure 
,ITM.Weight 
,ITM.DaysToManufacture 
,ITM.ProductLine 
,ITM.Class 
,ITM.Style 
,ITM.SellStartDate 
,ITM.SellEndDate 
,ITM.DiscontinuedDate 
,ITM.ModifiedDate 
FROM Production.Product ITM 
    LEFT JOIN Production.UnitMeasure SUOM 
       ON ITM.SizeUnitMeasureCode = SUOM.UnitMeasureCode 
    LEFT JOIN Production.UnitMeasure WUOM 
        ON ITM.WeightUnitMeasureCode = WUOM.UnitMeasureCode 
    LEFT JOIN Production.ProductModel PPM 
       ON ITM.ProductModelID = PPM.ProductModelID 
    LEFT JOIN Production.ProductSubcategory PPS 
        ON ITM.ProductSubcategoryID = PPS.ProductSubcategoryID 
    LEFT JOIN Production.ProductCategory PPC 
       ON PPS.ProductCategoryID = PPC.ProductCategoryID 

Note:
The reuse of database objects like views, stored procedures and user-defined functions comes with its costs because even if they are helping to simplify business logic’s maintenance, a change impacts the whole set of objects and applications referencing the changed object, thus for example some of the SSIS packages using the respective object could be invalidated. Sometimes it’s useful to keep a list with the objects and (especially) applications using your database objects, just in case you want to easily validate changes’ impact.

Step 2: Create the SSIS Project
From Start/Microsoft SQL Server 2008 folder open the SQL Server Business Intelligence Development Studio and from its Menu choose File/New/Project, in the New Project dialog choose choose Integration Services Project as Template, enter a meaningful (Project) Name (e.g. SSIS Package Template), specify the Location (e.g. D:\Work\SQL Server) and eventually change the default Solution Name, though that’s not normally required, then click ‘Ok’. 
 
SSIS - New Project
 
The new created project shell will look as below, with the default Package.dtsx, (eventually you could rename the package): 
 
SSIS - Project Shell
 
Step 3: Create the Data Source
     In the Solution Explorer click on Data Sources/New Data Source in order to open the Data Source Wizard in which you can create a new Data Source to AdventureWorks database using the Connection Manager as in the previous two tutorials or, in case the source is already available, just select it.

Notes:   
      Is not really required to create a Data Source explicitly, though this approach would allow you to easier manage the connections especially when the same connection will be reused in multiple packages.

Step 4: Create the Data Flow
     Within the Package.dtsx from Toolbox double click on the Data Flow Task, the Task being added to the Control Flow tab, then in order to add components to it click on the Data Flow tab and from Toolbox add an ‘OLE DB Source’ and an ‘OLE DB Destination’.
     Double click on the ‘OLD DB Source’ and in ‘OLE DB Source Editor’ dialog just opened selected the defined Data Source (e.g. AdventureWorks) in the OLE DB connection manager, in ‘Data Access mode’ from the list of available options select ‘SQL Command’ while in the below ‘SQL command text’ copy paste the below query: 

SELECT ITM.ProductID 
,ITM.ProductName 
, ITM.ProductNumber 
,ITM.ProductModel 
,ITM.ProductSubcategory 
,ITM.ProductCategory 
,ITM.MakeFlag 
,ITM.FinishedGoodsFlag 
,ITM.Color 
,ITM.StandardCost 
,ITM.ListPrice 
,ITM.Class 
,ITM.Style 
,ITM.SellStartDate 
,ITM.SellEndDate 
,ITM.DiscontinuedDate 
,ITM.ModifiedDate 
FROM Production.vProducts ITM 
WHERE ProductCategory = 'Bikes' 
 
SSIS - OLE DB Source Editor 
Notes:
1.    The vProducts could have included only the above attributes and the required constraint(s), though you always have to consider the changes in scope, typically being preferred to include all the attributes the business is typically interested in – this for the cases in which the number of attributes is quite huge or some of them are not used.
2.     Instead of using the ‘SQL Command’ you could have chosen the ‘Table or view’ Data access mode and use thus the vProducts view directly, in the end selecting only the needed columns in the Columns tab of the ‘OLE DB Source Editor’.
SSIS - OLE DB Source Editor Columns

   Once the data source was created, drag the green connector over the ‘OLE DB Destination’, and double click on the later in order to access the ‘OLE DB Destination Editor’. In ‘OLE DB connection manager’ select the destination source, it could be same connection used for the source, and select ‘Table or view – fast load’ as ‘Data access mode’. As the data needs to be dumped to a table, we either use an existing table or create one on the fly by clicking on the ‘New’ button, next to the ‘name of the table or the view’ control. Based on the source attributes, SQL Server already provides the script needed to create the table, all is needed to do is to change the default table name (e.g. OLE DB Destination) with a meaningful one (e.g. Production.Bikes):
CREATETABLE [Production].[Bikes] (
[ProductID]int,

[ProductName] nvarchar(50),

[ProductNumber] nvarchar(25),

[ProductModel] nvarchar(50),

[ProductSubcategory] nvarchar(50),
[ProductCategory] nvarchar(50),

[MakeFlag] bit,

[FinishedGoodsFlag] bit,

[Color] nvarchar(15),

[StandardCost] money,

[ListPrice] money,

[Class] nvarchar(2),

[Style] nvarchar(2),

[SellStartDate] datetime,

[SellEndDate] datetime,

[DiscontinuedDate] datetime,

[ModifiedDate] datetime

)

    Because is useful to keep the identity key (just in case you want to validate the logic) and the null values (unless you want to replace them with default values) check the ‘Keep identity’ and ‘Keep nulls’ checkboxes.
SSIS - OLE DB Destination Editor

Step 5: Testing the Data Flow Task
     Save the Package and from the Menu select Debug/Start debugging in order to run the package. Normally the package should run without problems, the tasks/components being shown in green as they are processed:
SSIS - Running the Package
     As always is a good idea to check if the data were saved as expected: 
SELECT * 
FROM [Production].[Bikes] 
ORDER BY ProductName 


Step 6: Delete the Previous Records
     Because the next time the package will be run the data will be written in the respective table making abstraction of the existing records, therefore is needed to delete the previous records before the data are dumped to the table. For this in Control Flow tab add an Execute SQL Task and in its Editor select the AdventureWorks Data Source as Connection, while in the SQL Statement add the following statement: 
 
TRUNCATE TABLE [Production].[Bikes]

SSIS - Delete Previous Records 
 
Notes:
1.    It’s preferred to TRUNCATE the table instead of using a DELETE statement, the later logging the deletion of each individual row in the transactional log while the TRUNCATE removes all table’s pages, no record deletion being actually performed.
2.    If you’re clicking on ‘Build Query’ button, because the Query Builder doesn’t support DDL statements you’ll get the following syntax error: “The TRUNCATE TABLE SQL construct or statement is not supported”. Just ignore the error message!
 
    Now link the Execution SQL Task connector to the Data Flow Task and by clicking again on it review its properties in Precedence Constraint Editor and assure that the Constraint option value is set to ‘Success’ (default value), this meaning that the next step in the package will be executed only if the precedent step succeeded. 
 
SSIS - Precedence Constraint Editor

Note:
     When in the current step data are deleted or important actions are performed, is always a good idea to process the next step only if the current task succeeded, otherwise your data/logic might be invalidated.

Step 7: Testing the Package
     Now you are ready to test (debug) the whole package,  but before this don’t forget to save your project! 
 
SSIS - Template Package

   Typically you’ll need to test the package at least twice in order to assure yourself that the previous data are deleted. It also helps to attempt a select from the [Production].[Bikes] table again, just to assure yourself that everything went as expected!

Notes:
1.    Actually you should save your work each time an important step is completed, because you never know when a runtime error occurs and your application closes unexpectedly, thus loosing your work.
2.    Usually when dealing with multiple tasks and transformations it makes sense to rename the respective objects, this allowing you to easier identify the objects.

07 February 2010

🎡SSIS: SQL Server to Oracle Data Export (Second Magic Class)

In a previous post I described the steps needed to be followed in order to export the data from SQL Server to Excel, this time I will describe the steps needed in order to export the data from SQL Server to Oracle. For this is requested to have Oracle database product installed on your computer, or in case you are having already an Oracle database server on the network then you’ll need only the Oracle Client installed locally, and a SQL Development Tool like SQL Developer or TOAD, with a plus for the later.

Like in the previous tutorial we’ll use the Production.Product table from AdventureWorks database coming with SQL Server.

Step 1: Create an Oracle User

If you already have an Oracle User created then you could skip this step, unless you want to create a User only for the current tutorial or for loading other AdventureWorks tables in Oracle. For this we will create first a permanent tablespace (e.g. AdventureWorks), an allocation of space in the database, then create the actual User (e.g. SQLServer) on the just created tablespace, action the will create a schema with the same name as the User, and finally grant the User ‘create session’, ‘create materialized view’ and ‘create table’ privileges.

Open your SQL Developer tool of choice and connect to the Oracle database, then type the following statements and run them one by one, do not forget to provide a strong-typed password in IDENTIFIED BY clause, then create a new connection using the just created User.
 
-- Create TableSpace
CREATE BIGFILE TABLESPACE AdventureWorks
DATAFILE 'AdventureWorks.dat'
SIZE 20M AUTOEXTEND ON; 

-- Create User CREATE USER SQLServer 
IDENTIFIED BY <your_password>
DEFAULT TABLESPACE AdventureWorks 
QUOTA 20M ON AdventureWorks; 

-- Grant privileges
GRANT CREATE SESSION
, CREATE MATERIALIZED VIEW
, CREATE TABLE TO SQLServer; 

Step 2
: Start SQL Server Import and Export Wizard

From SQL Server Management Studio choose the database from which you want to export the data (e.g. AdventureWorks), right click on it and from the floating menu choose Tasks/Export Data

Step 3: Choose a Data Source

In ‘Choose a Data Source’ step select the ‘Data Source’, SQL Server Native Client 10.0 for exporting data from SQL Server, choose ‘Server name’ from the list of SQL Server available, select the Authentication mode and the Database (e. g. AdventureWorks), then proceed to the next step by clicking ‘Next’.

Step 4: Choose a Destination

In ‘Choose a Destination’ step select the Destination, in this case ‘Oracle Provider for OLE DB’ and then click on ‘Properties’ in order to provide the connectivity details, in ‘Data Link Properties’ dialog just opened, enter the Data Source (the SID of your Oracle database), the ‘User name’ (e.g. SQLServer), the ‘Password’ and check ‘Allow saving password’ checkbox, without this last step being not possible to connect to the Oracle database. Then test the connection by clicking the ‘Test Connection’, and if the ‘Test connection succeeded’ proceed to the next step. 

Note:
Excepting ‘Oracle Provider for OLE DB’ there are three other drivers that allows you to connect to an Oracle database: ‘Microsoft OLE DB Provider for Oracle’, ‘.Net Framework Data Provider for Oracle’, respectively ‘Oracle Data Provider for .Net’, each of them coming with their own downsizes and benefits.

Step 5: Specify Table Copy Or Query

In this step choose: ‘Copy data from one or more tables or views’ option.

Step 6: Select Source Tables and Views

In ‘Select Source Tables and Views’ step select the database objects (e.g. Production.vProducts) from which you’ll export the data. You could go with the provided Destination table, though if you are using the current settings Oracle table’s name will be “Product” (including quotes) and not Product as we’d expected. There are two options, go with the current settings and change table’s name and columns, they having also this problem, in Oracle, or create the table manually in Oracle. I prefer the second option because I could use the SQL script automatically generated by Oracle, for this with the just chosen table selected click on ‘Edit Mappings’ button that will bring the ‘Column Mappings’ dialog and click the ‘Edit SQL’ button, the query appearing as editable in ‘Create Table SQL Statement’ dialog. 


Copy the query and copy paste it in the Oracle SQL Developer, then do a replace of the quotes and delete the rowguid column as we don’t needed, in plus when attempting to dump the data, given the incompatibility of data types, an error will be raised. There is a second change we’ll have to make, to rename the Size column to ProductSize, this because Size is a reserved keyword.

 
CREATE TABLE sqlserver.Product (
ProductID INTEGER NOT NULL,
Name NVARCHAR2(50) NOT NULL,
ProductNumber NVARCHAR2(25) NOT NULL,
MakeFlag NUMBER NOT NULL,
FinishedGoodsFlag NUMBER NOT NULL,
Color NVARCHAR2(15),
SafetyStockLevel INTEGER NOT NULL,
ReorderPoint INTEGER NOT NULL,
StandardCost NUMBER NOT NULL,
ListPrice NUMBER NOT NULL,
ProductSize NVARCHAR2(5),
SizeUnitMeasureCode NCHAR(3),
WeightUnitMeasureCode NCHAR(3),
Weight NUMBER,
DaysToManufacture INTEGER NOT NULL,
ProductLine NCHAR(2),
Class NCHAR(2),
Style NCHAR(2),
ProductSubcategoryID INTEGER,
ProductModelID INTEGER,
SellStartDate TIMESTAMP NOT NULL,
SellEndDate TIMESTAMP,
DiscontinuedDate TIMESTAMP,
ModifiedDate TIMESTAMP NOT NULL) 

Unfortunately this approach has a downside, we have to go two steps back in Choose a Destination, then click on ‘Properties’ again and without doing any change test the connection by clicking the ‘Test Connection’, then proceed forward to the current step, and in ‘Select Source Tables and Views’ step select again the database object (e.g. Production.vProducts) from which you’ll export the data but this time in Destination dropdown control search for the table just created (e.g. sqlserver.Product).

Because we have removed the rowguid column from the table created in Oracle, we’ll have to change the mappings, for this click on ‘Edit Mappings’ and in ‘Mapping’ list box from ‘Column Mappings’, in the Destination dropdown next to rowguid column select ‘’, thus the respective column being ignored from the mapping. Accept the change and proceed to the next step. 


Note:
You could choose to export more than one table, though for this you’ll have to create manually each table in Oracle and then map the created tables in ‘Select Source Tables and Views’ step.

Step 7: Review Data Type Mapping

Step 8: Save and Run Package

In ‘Save and Run Package’ check the ‘Run immediately’, respectively the ‘Save SSIS Package’ and ‘File System’ option, then proceed to the next step by clicking ‘Next’.

Step 9: Save SSIS Package

    In ‘Save SSIS Package’ step provide the intended Name (e.g. Export Products To Oracle) or Description of the Package, choose the location where the package will be saved, then proceed to the next step by clicking ‘Next’.

Step 10: Complete the Wizard

Step 11: Executing the Package

Step 12: Checking the Data

If the previous step completed successfully, then you can copy the following statement in Oracle SQL Developer and execute it, the table should be already populated.

SELECT * 
FROM sqlserver.Product 

Note:

If you used other schema to connect to, then you’ll have to replace the above schema (e.g. SQLServer) with your schema.

05 February 2010

🎡SSIS: Wizarding an SSIS Package (First Magic Class)

I'm sorry to disappoint you, this it’s not another story about Harry Potter! It’s about how to create an SSIS package without any knowledge about SSIS or the components of an SSIS Package with the help of ‘SQL Server Import and Export Wizard’ available from the SQL Server 2008 Management Studio. Here are the steps needed to be followed in order to create a Package that exports the data from a local table to an Excel file.

Step 1: Start SQL Server Import and Export Wizard

From SQL Server Management Studio choose the database from which you want to export the data (e.g. AdventureWorks), right click on it and from the floating menu choose Tasks/Export Data. This action will bring the ‘SQL Server Import and Export Wizard’ used, as its name indicates, for importing and exporting data on the fly from/to SQL Server or any other source.
Step 2: Choose a Data Source

In ‘Choose a Data Source’ step select the ‘Data Source’, SQL Server Native Client 10.0 for exporting data from SQL Server, choose ‘Server name’ from the list of SQL Server available, select the Authentication mode and the Database (e. g. AdventureWorks), then proceed to the next step by clicking ‘Next’.
Step 3: Choose a Destination

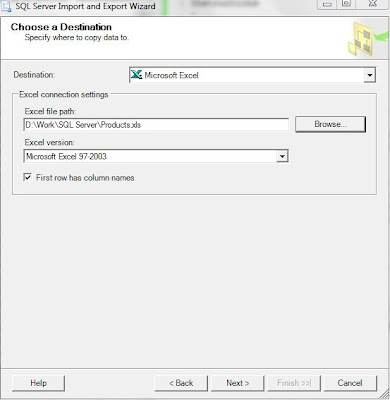
In ‘Choose a Destination’ step select the Destination, in this case ‘Microsoft Excel’, browse for the Excel file to which you want to export the data (e.g. Products.xls) and check ‘First row has column names’ in case you want to include the column names, then proceed to the next step by clicking ‘Next’.
Step 4: Specify Table Copy or Query

In ‘Specify Table Copy or Query’ step there are two options you could choose: ‘Copy data from one or more tables or views’ or ‘Write a query to specify the data to transfer’ – their names are speaking for itself. The second option allows for more flexibility and you could just copy paste the query used for your expert. In this example just go with the first option and then proceed to the next step by clicking ‘Next’.
Step 5: Select Source Tables and Views

In ‘Select Source Tables and Views’ step select the database objects (e.g. Production.vProducts) from which you’ll export the data, then proceed to the next step by clicking ‘Next’. If the destination allows it, it’s possible to choose more than one database object.
Step 6: Review Data Type Mapping

In ‘Review Data Type Mapping’ typically you could go with the provided defaults thus you can proceed to the next step by clicking ‘Next’.
Step 7: Save and Run Package

In ‘Save and Run Package’ step you could choose to ‘Run immediately’ the package and/or ‘Save SSIS Package’ to the ‘SQL Server’ or locally to the ‘File System’. Saving the package locally allows you to modify and rerun the package at a later date. For this example check the ‘Run immediately’, respectively the ‘Save SSIS Package’ and ‘File System’ option, then proceed to the next step by clicking ‘Next’.
Step 8: Save SSIS Package

In ‘Save SSIS Package’ step provide the intended Name (e.g. Export Products) or Description of the Package, choose the location where the package will be saved, then proceed to the next step by clicking ‘Next’.
Step 9: Complete the Wizard

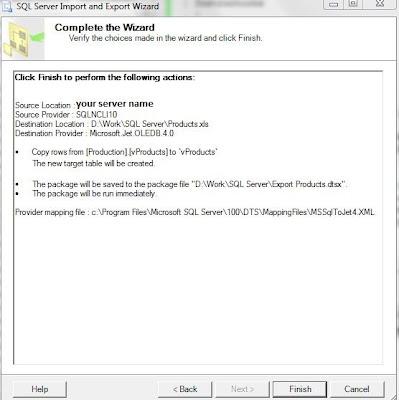
The ‘Complete the Wizard’ step allows reviewing the choices made in the previous steps and eventually navigating to the previous steps in order and to the needful changes. Therefore once you proved the details proceed to the next step by clicking ‘Next’.
Step 10: Executing the Package

In ‘Executing the Package’ step the Package is run, the progress being shown as each step. Just close the Package once you reviewed the steps.
If the package run successfully you can go on and check the exported data, apply additional formatting, etc.

Step 11: Inspecting the Package

The package can be reopened and modified in Microsoft Visual Studio or SQL Server Business Intelligence Development Studio, for this just open one of the two environments and from the Main Menu select File/Open File, then browse for the location where the Package (e.g. Export Products.dtsx) was saved and open the file. Here is the package created by the Wizard:
As can be seen the package contains two tasks, the ‘Preparation SQL Task 1’ which creates the table (e.g. vProducts) in the Excel file, and ‘Data Flow Task 1’ which dumps the data in the created table. By double clicking the ‘Data Flow Task 1’ you could see its content: - the ‘Source - vProducts’ OLEDB Data Source holding the connectivity information to the SQL Server and the list of Columns in scope. - the ‘Data Conversion’ Transformation that allows converting the data between Source and Destination given the fact that Excel has different data types than SQL Server - the ‘Destination - vProducts’ Excel Destination holding the connectivity information for the Excel file and the Mappings in place.
You could explore the properties of each object in order to learn more about its attributes used and the values they took.

Ok, so you’ve open the package, how do you run it again? For this is enough to double click on the locally saved Package (e.g. Export Products.dtsx), action that will bring the ‘Execute Package Utility’, and click on the ‘Execute’ button to run the Package.
If you haven’t done any changes to the Excel file to which you moved the data (e.g. Products.xls) and haven’t moved the file, then the package will fail when it attempts to run the ‘the ‘Preparation SQL Task 1’ task because a table with the expected name already exists in the file.
In order to avoid this error to appear you’ll have to delete from the Excel file the sheet (e.g. vProducts) where the data were dumped and save the file. Now you could execute again the package and it should execute without additional issues.

If you’ve removed/deleted the Excel file, even if you get a warning that the Excel file is not available, the package will run in the end without problems. Instead of deleting the sheet manually you could use the File System Task to move the file to other location, though that’s a topic for another post.
Related Posts Plugin for WordPress, Blogger...

About Me

My photo
Koeln, NRW, Germany
IT Professional with more than 24 years experience in IT in the area of full life-cycle of Web/Desktop/Database Applications Development, Software Engineering, Consultancy, Data Management, Data Quality, Data Migrations, Reporting, ERP implementations & support, Team/Project/IT Management, etc.